More sidetracking – Polymorph pellets
Mat from madmat3dprinting.com.au sent me some polymorph pellets and flexible filament to try. I started with the polymorph pellets. These are thermoplastic that melts at around 60° C and can be moulded by hand.
Sidetrack sample p1-5 Can I make a multi-coloured plastic lump, roll it out and shape or emboss it?

Polymorph beads and tubs ready to go.

Beads in tubs with hot water. Some drops of old silk dyes in a couple.

Basically the colour was unsuccessful. The colour was squeezed out with the water. There is a slight trace of the pink visible, but I suspect that is more trace “foreign matter” remaining in the plastic (just as there are smears of dirt in the plain sample – the garage is partially open, so always dirty.)
Sidetrack sample p1-6. Can I remelt and remould plastic no longer in beads?

One part back in hot water. It went transparent, suggesting it had remelted.
I quickly kneaded it and rolled it flat with a rolling pin, working quickly as it was already turning white. I pressed in a plastic shape (originally the side of a peg basket, I think)

The embossing worked. I think my palm-print is in it – not visible, but the roughness can be felt. The plastic is slightly flexible.

Backlit the pattern is very clear.
Sidetrack sample p1-7.
Can I print with it?

I rolled on acrylic paint using a foam roller, and tried to print onto cartridge paper.
The first two prints (on the left) weren’t successful. The first had too much water in the roller. Both the first two were on a hard surface.
The third and fourth were printed on a softer surface and are more successful, but I think I can see the influence of my palm print.
Sidetrack sample p1-8
Can I clean the paint off and reuse the plastic?

A toothbrush and cold water got rid of most of the paint. I might have got more with soap and warm (not hot!) water, but I wasn’t too fastidious – I’m curious as to how much colour sticks around after reuse.
This time I remelted, kneaded and rolled, then back into the water for a soften. Then out, roll and emboss – pressing with the rolling pin rather than my hands.
The plastic is beginning to look rather grubby and there are some bubbles in it. Air? Water? A reaction to impurities?

On the left I pressed down by hand. On the right I tried to keep the pressure more even, by putting a piece of 3 or 4 mm perspex on top and pressing on that. Although not at all “clean” I rather like the one on the right – it seems to have some character.
Sidetrack sample p1-9
Can I use the original object and combine the prints?

The first attempt, top right, I didn’t think about where I’d put the paint on the stamp. Quite a lively, interesting result. I like the unintended inclusion of the second underprint (the one to the left). It all seems to work together.
Lower down is the second overprint. I thought much more about placement, and the underprinting was my favourite. I find the result a little dull. Too predictable?

I now have a rather grubby stamp and two other pieces – one faintly pink, the other faintly yellow.
Sidetrack sample p1-10 I want to try some inclusions, and make a lacey, fluttery shape.

A rather amusing interlude later, and I have a flower-like shape firmly attached to some pvc pipe, and little bits of colourful foil all over my work area.
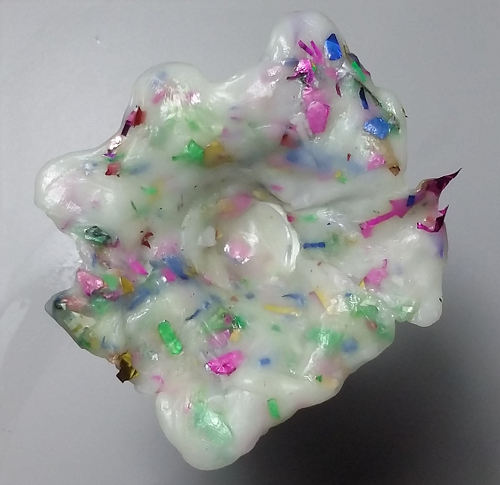
The inclusions work quite nicely (although the leftovers are going into a secure bin as soon as I can track them down).
I was trying to mould around the pipe and it was a nasty shock when it wouldn’t come loose. Still, this is very useful information. The molten pellets bond very firmly to pvc.

Backlit looks good, and there is a clear sense of layers in the inclusions. I think this has a lot of promise – always being careful of the application (no hot water anywhere, and probably not any heat).
Sidetrack sample p1-11. Can I colour the polymorph plastic using disperse dyes?
I ironed the back of the relatively flat embossed piece with a paper of disperse dye – between baking paper to protect iron and surface.

It looked great when still warm. Above it is still on the paper and the view is actually through the warm plastic to the back.

Once cool the paper was removed with just a little patience. The baking paper hadn’t stuck at all when ironing.

A little colour floated away in hot water, but most stayed.

Strong colour remained in the moulded, cooled plastic!

The backlit view shows striations where the colour isn’t completely mixed through. Rather a nice flower petal effect.
Sidetrack sample p1-12. Will adding another colour lead to colour mixing?

It’s hard to judge what’s happening with colour when the plastic is still warm and transparent.

Patience failed, and some disperse dye paper was left stuck to the plastic.

It was easy to rub off the paper in cold water.
I had softened and partly flattened the plastic before ironing with the dye, but the surface was still rough and uptake of colour uneven.

Part-mixed the plastic shows a lot of colour variation. Of particular interest are some thicker edge parts which remained pink and didn’t soften a lot when remelting. This suggests all sorts of possibilities for colour variation.

The final, cooled result was a rich purple – the mix of the pink and dark blue dyes added.
Being able to add strong colour like this really opens the polymorph to all sorts of applications, especially with the ease and flexibility of mixing colours.
Sidetrack sample p1-13. I decided to return to earlier crumpling experiments with ribs – see for example sample p1-13 (30-March-2015). Very happy with the result.


Unfortunately this session was cut short. Some ideas to continue with next time :
* Adding powdered colour. Not my dyes – bad / hazardous to use in powdered form. Other pigments.
* inclusions – How far can you go? What happens as it loses cohesion or structural integrity?
* Apply heat in other ways than immersion in hot water? Can one work more precisely?
* Tendency to catch to itself – avoid by wide / flat container
* adherence to other plastics -especially ABS filament?
* Can I write with 3D pen on to /from it?
* how would it react to scraps of filament included in it?
* would a stainless steel bar work better than a wooden rolling pin?
* can one cut/ pierce the hardened plastic – hot needle; awl; various knives?
* if it adheres to carrier plastic, can I smear it on to use as shaping support?
* I wanted to get lacey effects, but it pulls more like toffee. Accept this and go for gothic? Fight it -say use tools (awl?) while moulding?

Wow, I had never heard of these! The results are really interesting and it has a lot of scope for further experiments and being incorporated in work.
I recently bought a marble rolling pin from a kitchen shop for printing. It gives good results because it has extra weight, compared to a wooden one, and is more reliably flat. It might allow for thinner rolling while the medium is still soft?
Claire has some too – it will be interesting to see what she does, there seem to be so many possibilities.
The marble rolling pin sounds a good idea. I was thinking heavy, but also hard so the plastic doesn’t pick up anything. It’s quite sticky to some things when warm – softer/fibrous stuff like paper and kitchen towel, but not to hands, metal, ceramic tile.
Mat’s very fast at sending parcels out, if you want to give them a try.
Oh no! A whole new area of art to explore… as if I didn’t have enough on my hands….:-) Great exploration!
I guess we never have to be bored 🙂
With this course I’m on an expansive, exploratory stage, but I think there have to be phases of contraction too, focusing on depth or core.
Hey,
I finally got around to reading this blog and it’s fantastic!
One thing I would suggest that’s better than a metal rolling pin is a Heated rolling pin/warming up the metal in hot water too. This will prevent it from going cold and hard really quickly.
I’ve also noticed when re-heating chunks of it that you can pinch and pull some edges and get a really thin plastic film. Haven’t tried it on larger scale though.
Thanks Mat. It’s great – always more to try!